
Install and connect Salesforce
Say where you send from, install the Tally Sign package, then sign in once as a Salesforce admin. Tally Sign checks what your org has and adapts to it.
11 sections · 2 screenshots
All setup happens in Tally Sign, in this order: say where you send from, check your org, install the package, connect, then put Tally Sign on your record pages. The whole setup takes under 30 minutes. It works with Revenue Cloud quotes, Sales Cloud opportunities, orders and contracts, Salesforce CPQ quotes and your own custom objects. Nothing changes for documents you send from Tally Sign itself. The walkthrough below plays each step; stop it any time and click through it yourself.
Where will you send from?
Install Tally Sign App in Salesforce, for admins only. It works with or without Quotes and Orders.
Before you start
Check these first.
| Check | Where |
|---|---|
| Tally Sign plan: Tally Sign for Salesforce. Companies on the free trial can connect too | Settings → Billing. See Seats for pricing |
| Your role in Tally Sign: owner or admin | Settings → Team |
| Salesforce edition: Enterprise, Unlimited, Performance or Developer Edition | Setup → Company Information → Organization Edition |
Revenue Cloud, Quotes and Orders aren't required: the package installs in any supported org, and you can send from opportunities, contracts, accounts, custom objects or any other object. When Quotes or Orders are on, connecting adds what goes with them (see What Tally Sign adds to your org).
Pick the Salesforce user Tally Sign will connect as. Tally Sign works in Salesforce as this user:
- A System Administrator, or a dedicated user with a full Salesforce license and the API Enabled, Customize Application, Modify Metadata, Assign Permission Sets and View Setup and Configuration permissions.
- The user must be able to sign in to Salesforce in a browser. API-only users and the free Salesforce Integration license can't connect.
- Salesforce updates are made as this user, and automation rules fill documents with the fields this user can see.
Where will you send from?
Setup starts with one question: which Salesforce records does your team send documents from? Pick every one that applies. Setup then covers only those, and Check Salesforce looks for Tally Sign on each of them.
| Pick | Send with Tally Sign comes from |
|---|---|
| Opportunities, Contracts, Accounts | The package. |
| Quotes, Orders | Tally Sign adds it when you connect, if your org has Quotes or Orders turned on. |
| CPQ Quotes | Tally Sign adds it when you connect, if Salesforce CPQ is installed. |
| A custom object | Tally Sign adds it to the custom object you choose after connecting (see Custom objects). |
Anyone can see the answer in Settings → Salesforce; owners and admins can change it any time. How to install in Salesforce at the top of that page opens this walkthrough with your answer already picked.
1. Install the package
- In Tally Sign, open Settings → Salesforce.
- Under Where will you send from?, pick every place your team sends from.
- Under Where does your org sign in?, choose Production, Sandbox or Custom domain. For a custom domain, enter your My Domain, for example
northbeam.my.salesforce.com. You can also paste any Salesforce address from your browser's address bar; Tally Sign shows the My Domain it will use. - In step 1, Install Tally Sign in Salesforce, choose Install in Salesforce. It opens your org's install page for Tally Sign App in a new tab.
- Sign in to Salesforce as an admin, choose Install for Admins Only and choose Install. Reps get access later with the Tally Sign User permission set.
- When Salesforce asks you to approve third-party access to
https://app.tallysign.com, check Yes, grant access to these third-party web sites and choose Continue. Installing takes about a minute. - When it says Installation Complete!, choose Done. Tally Sign App is listed in Setup → Installed Packages.

2. Connect your org
- Back in Tally Sign, in step 2, Connect your org, choose Connect Salesforce.
- Sign in to Salesforce as the user you picked and choose Allow.
- You're sent back to Tally Sign, which shows Connected.
Connecting links the package to your Tally Sign account and gives the Salesforce user you connected as the Tally Sign Admin permission set. If the user is missing one of the permissions above, the panel says which one and what it stops Tally Sign from doing. Give the user the permission and choose Refresh, or connect as a different user.
If you picked A custom object, choose it now under Where you send from (see Custom objects).
Next, give reps access and put Tally Sign on your record pages: see Add Tally Sign to Salesforce.
What we found
After connecting, Tally Sign looks at your org and lists what it found: Revenue Cloud, Quotes, Orders, Contracts, Salesforce CPQ, Billing, Multi-currency and the Tally Sign package with its version. Features your org doesn't have are skipped.
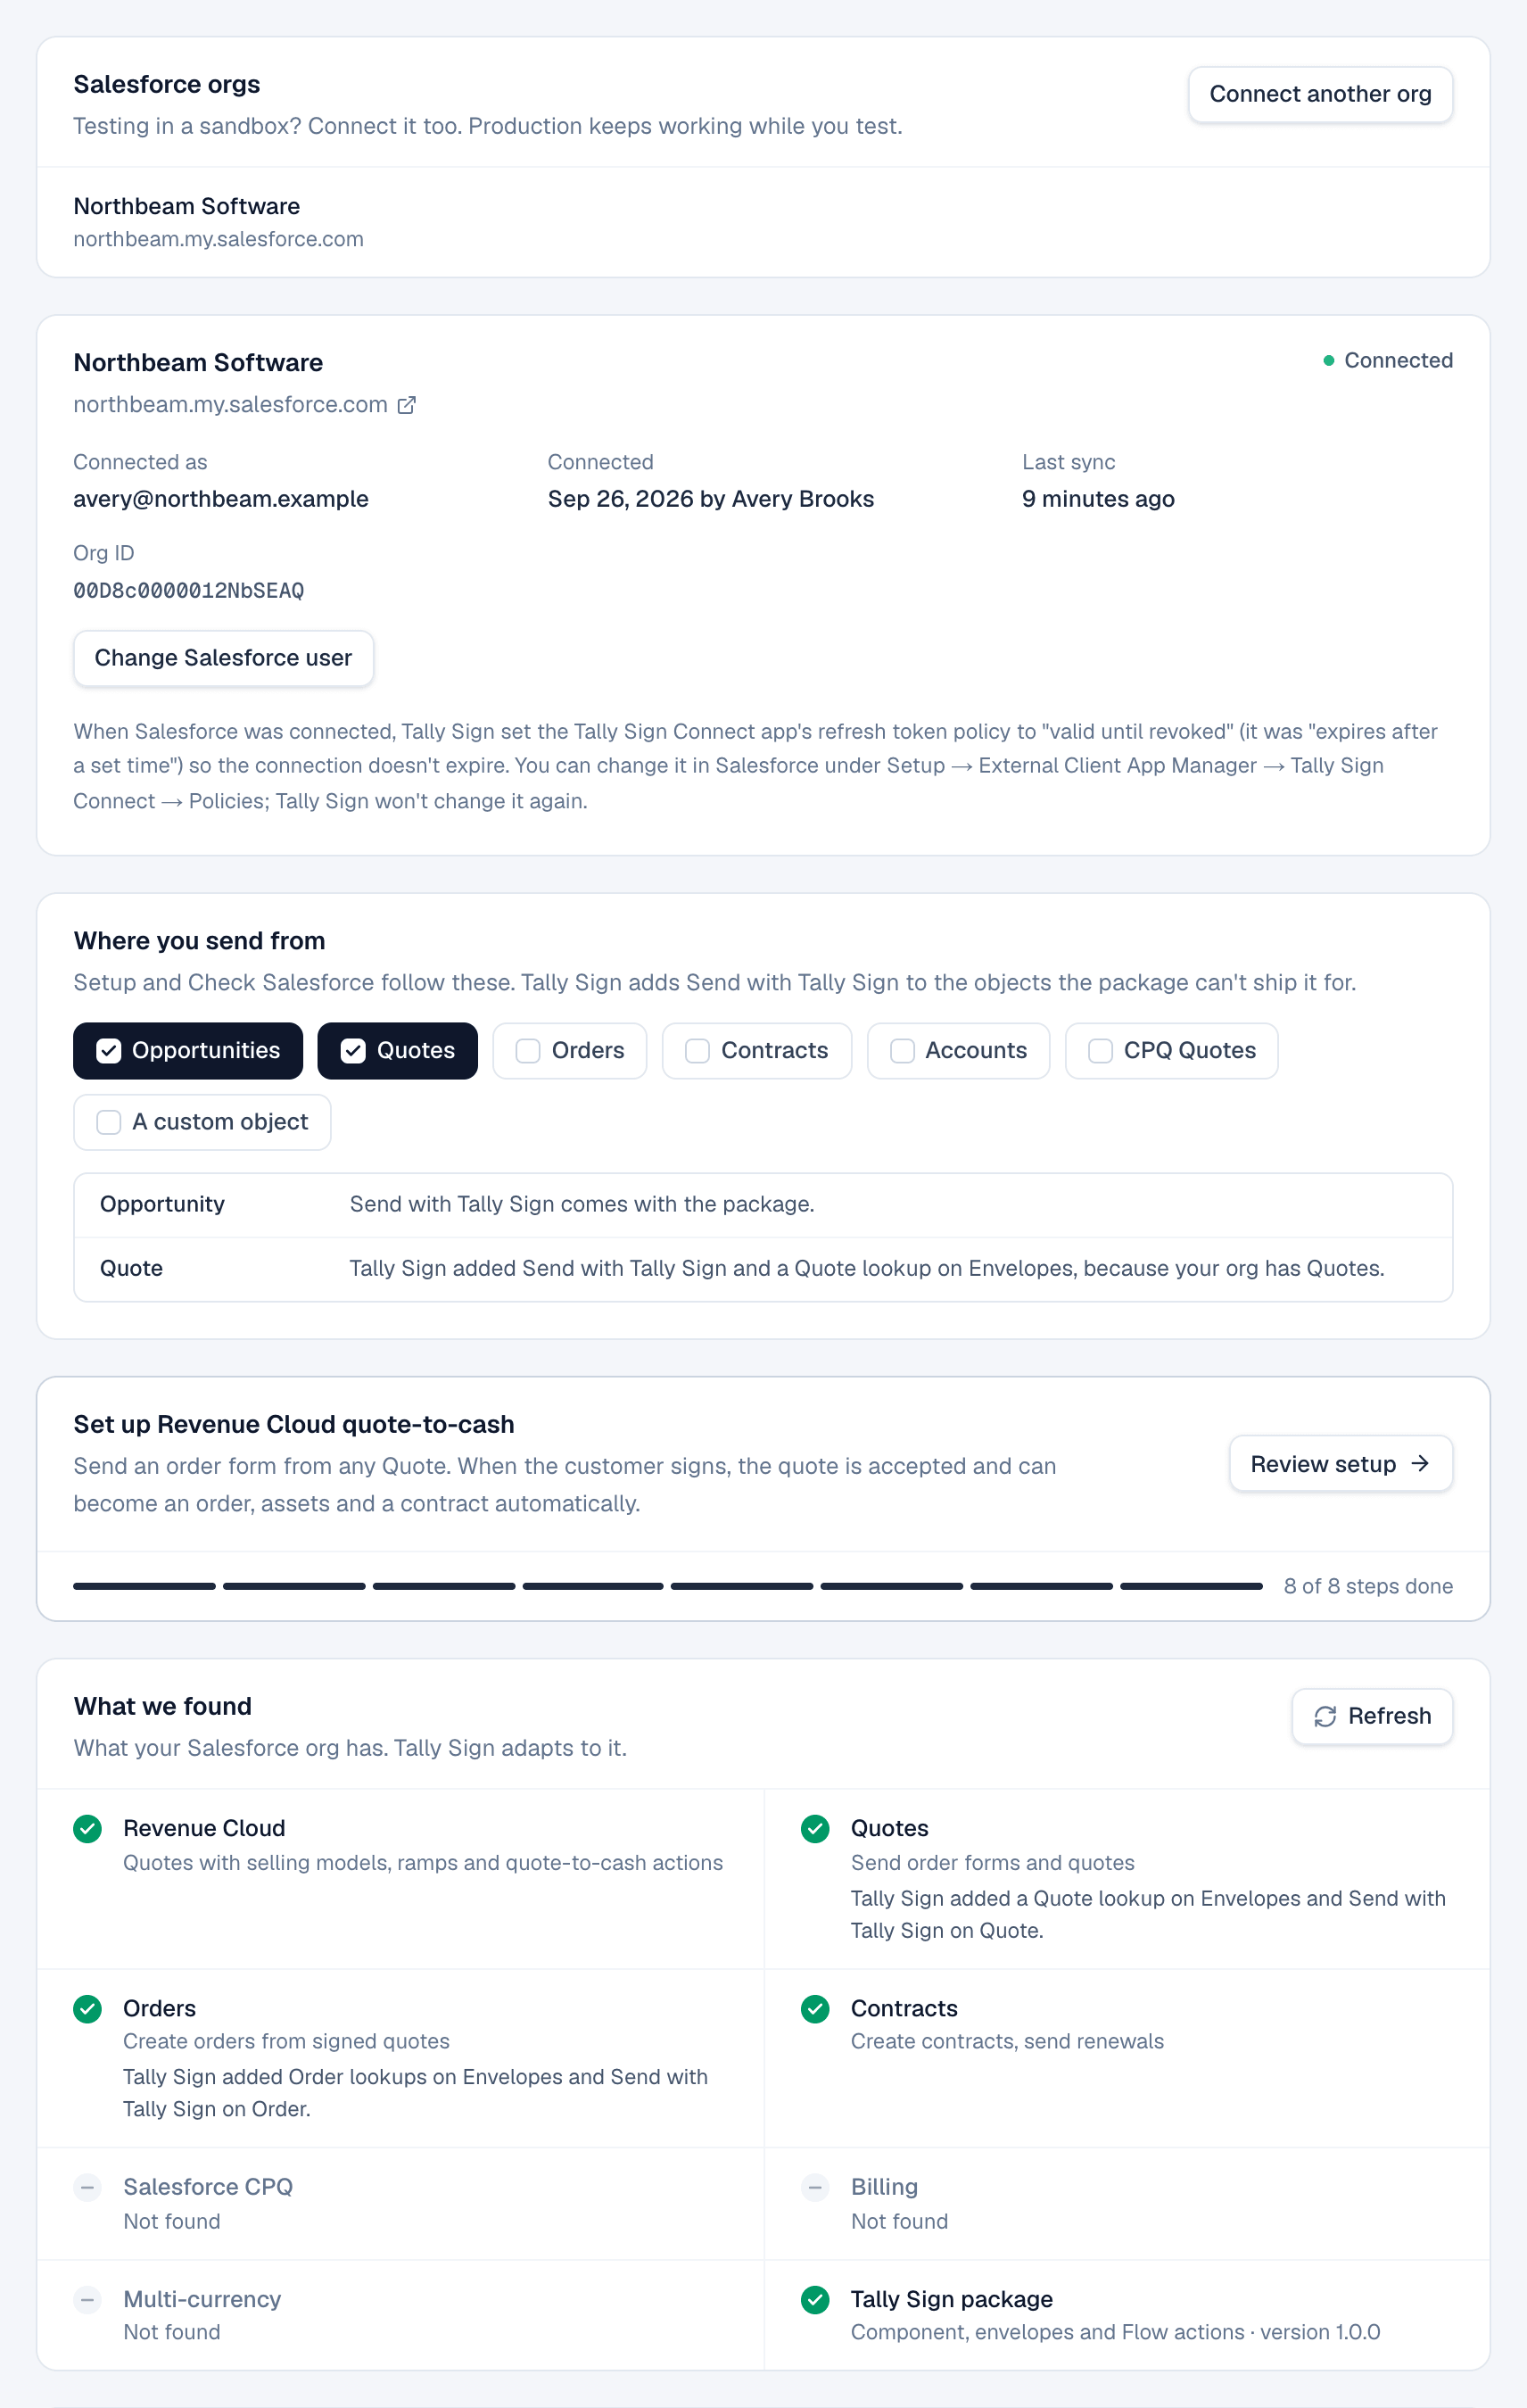
- Connected as shows the Salesforce user Tally Sign works as.
- Last sync shows when Tally Sign last wrote to Salesforce.
- Choose Refresh after you turn something on in Salesforce, or after installing or updating the package.
What Tally Sign adds to your org
The package itself doesn't use Quotes, Orders, CPQ or your custom objects, so it installs in any supported org. Connecting (or Refresh) adds what goes with the ones you have and send from:
| When | Tally Sign adds |
|---|---|
| Your org has Quotes | A Quote lookup on Envelopes, so a quote's envelopes show in its Envelopes related list, and the Send with Tally Sign action on Quote. What we found says so next to Quotes. |
| Your org has Orders | Order and Created Order lookups on Envelopes (Created Order is the order made from a signed quote), and Send with Tally Sign on Order. |
| You send from CPQ Quotes and Salesforce CPQ is installed | Send with Tally Sign on the CPQ Quote. |
| You send from a custom object | Send with Tally Sign on it, and with Show envelopes in a related list on, an Envelope lookup to it. |
- Access to the new lookups comes from a permission set Tally Sign creates, Tally Sign Quotes and Orders. Tally Sign assigns it to everyone who has Tally Sign Admin or Tally Sign User each time you connect or choose Refresh. Gave someone access since? Choose Refresh, or assign it yourself.
- Add Send with Tally Sign to the Quote and Order page layouts like on other objects (see Add Tally Sign to Salesforce).
- Turned on Quotes or Orders after connecting? Choose Refresh in Settings → Salesforce.
- Without them, every envelope still records the record it was sent from (Related Record), and Account, Opportunity and Contract lookups fill in as usual.
Custom objects
To send from your own object, for example a Service Agreement (Service_Agreement__c):
- Under Where will you send from?, pick A custom object.
- After connecting, under Where you send from, choose the object from Pick a custom object and choose Add. The list shows your org's custom objects.
- Leave Show envelopes in a related list on to add an Envelope lookup to the object. Tally Sign fills it in on every envelope sent from one of its records.
Tally Sign adds Send with Tally Sign to the object right away. Then put the component and the action on its record page like any other object: see Add Tally Sign to Salesforce. To show the record's envelopes, add the Envelopes related list to the object's page layout.
A template for the object is linked to it in the editor: see Salesforce fields in templates.
Package updates
When a newer version of the package is out, What we found shows the version you have and the one available, and the Tally Sign package panel shows Package update available. Choose Install next to the update link, then Refresh. The link opens your own org's login (its My Domain, or test.salesforce.com for a sandbox), so a sandbox update can't land in production by mistake. Your envelopes and settings are kept.
Change the Salesforce user
To move Tally Sign to another Salesforce user, for example before the admin who connected leaves, choose Change Salesforce user under the connection. Sign in to Salesforce as the new user and choose Allow. Nothing is disconnected: sending, syncing and automation keep running. Only users from the connected org are accepted.
Sandbox and production
You can connect your production org and one or more sandboxes at the same time. Each org sends and syncs on its own, and envelopes from a sandbox never show up in production, even when record ids match. Install the package in each org you connect.
- In Settings → Salesforce, choose Connect another org under Salesforce orgs.
- Choose Sandbox (or Custom domain with the sandbox's My Domain), install Tally Sign in the sandbox with step 1, then choose Connect Salesforce.
- Choose Work in this org next to the org you want to set up. Template fields, automation rules, seats and record search in Tally Sign use that org. Everyone else stays on production until they switch.
- Emails from a sandbox. Sandboxes copied from production have real customer contacts. By default, signing emails for anyone outside your company go to the person sending instead, and the send form says so. To test with real recipients, turn on Email real recipients from this sandbox.
- One production org. Connecting a different production org doesn't replace the one you have. Tally Sign asks first, and Replace production org disconnects the old one.
- Refreshed sandbox. After a sandbox refresh, connect it again. The old copy is disconnected, and its automation rules can be moved to the new copy from Automation.
- One company per org. A Salesforce org can be connected to one Tally Sign company at a time. If it's connected elsewhere, Tally Sign asks before moving it, and the other company's admins are emailed.
If connecting fails or the connection stops working
When Salesforce refuses the sign-in, Settings → Salesforce says what happened and what to do, and keeps it on the page until you dismiss it. The usual causes:
| What you see | What to do |
|---|---|
| That Salesforce org doesn't have Tally Sign installed | Install the package in that org first. If the package was uninstalled, install it again. If the browser is signed in to another org, choose Pick a Salesforce login. |
| Salesforce only lets pre-approved users use Tally Sign | In Salesforce, open Setup → External Client App Manager → Tally Sign Connect → Policies. Add the connecting user's profile or permission set, or set Permitted Users to All users may self-authorize. Then connect again. |
| Salesforce blocked Tally Sign because of IP restrictions | In the same Policies page, set IP Relaxation to Relax IP restrictions. Tally Sign's servers don't have fixed IP addresses. Once it's changed, choose Check again; you don't need to reconnect. |
| Access wasn't approved | Deny was chosen on Salesforce's approval screen. Connect again and choose Allow. |
| The Salesforce user Tally Sign connects as is frozen or inactive | Reactivate the user in Salesforce, or choose Change Salesforce user. |
| Salesforce comes with the Tally Sign for Salesforce plan | Your company is on the per-user plan. Switch plans in Settings → Billing, then connect. |
If Tally Sign can't reach Salesforce later, the panel shows Not working with the reason and either Reconnect or Check again, and a banner across the top of Tally Sign says so until it's fixed. Owners and admins also get an email. In Salesforce, reps see a short message asking a Tally Sign admin to reconnect, and admins get a link to these settings. Updates that happen meanwhile (envelope status, write-backs, signed PDFs, orders) are kept and sent as soon as it's fixed. Updates held for more than 30 days wait for you to choose Retry.
If Salesforce refuses an update, for example because of a validation rule, a locked record or a field the connected user can't edit, Tally Sign tries again on its own for about four days. Updates that still fail, or that can't work by trying again, are listed under Salesforce updates that need attention with the document and Salesforce's message, and owners and admins get an email. Fix the cause in Salesforce, then choose Retry (or Retry all). Steps that already went through aren't repeated, so no second order, contract or PDF is created. Choose Dismiss if you finished it by hand; its error also leaves the envelope's Last Error.
Disconnect at the bottom of the page stops sending from that org and syncing back to it. Its automation rules are turned off and their Flows are removed from Salesforce. The rules stay in Automation, where you can delete them or move them to another connected org. Documents already sent can still be signed. Updates wait until you connect the same Salesforce org again (up to 30 days), then catch up. Your templates and settings are kept.
On the website: Any object·Pricing